
Introduction
We provide this guide in order to help our users get used to Git integration at SourceLair and make the most out of it. Reading this guide you will be able to work professionally using Git in SourceLair.
This guide assumes that you already have:
You can learn how to use Git here .
Working locally
This section is going to describe a simple workflow without remotes (i.e. your server, GitHub, BitBucket). We assume that you are working on an HTML project but you can follow this workflow for every type of project.
Commit your changes
Starting a project in SourceLair provides you an empty Git repository. So everytime you want to save a version of your code to your Git repo, you have to commit your existing code.
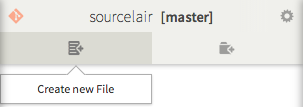
Create a file index.html
Create a new file "index.html" in your file explorer.
Write some code
Your index.html will open in your editor so write your code there and press "Save". Here is an example you can copy and paste:
<!doctype html>
<html>
    <head>
        <meta charset="utf8" />
        <title></title>
    </head>
    <body>
        <h1>Hello</h1>
        <p>That's my first html project at SourceLair and it seems cool.</p>
    </body>
</html>
You can also press "Preview File" or Ctrl+Enter in order to live preview your code.
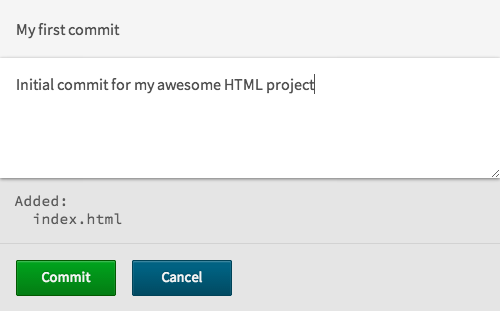
Commit
Open the Command Palette and type "Commit".
Choose the "Source Control:Commit" option, fill in the necessary information (like below) and commit.
You may have noticed that your file now is not highlighted. This means that your file is not uncommited anymore (blue=commited). You can read more about visual status for Git in the last step of this guide.
Diff, log and reset
You have already commited your code to your repo. Let's check out some commands that are not supported yet from Command Palette but they are very useful to use them from your terminal in SourceLair.
Initially, let's change a little bit your html code in order to understand the use of these commands. Let's change h1 content to Hello everybody! so your code will be like:
<!doctype html>
<html>
    <head>
        <meta charset="utf8" />
        <title></title>
    </head>
    <body>
        <h1>Hello everybody!</h1>
        <p>That's my first html project at SourceLair and it seems cool.</p>
    </body>
</html>
Commit this change as before and give to your commit a name like "My second commit". After commiting, your current code is saved to your repository. Let's check some useful commands:
- git diff: It shows the difference between 2 versions of your code. In this example if you wanted to check the differences between your first and second commit, you would write on your terminal:
git diff HEAD~1
And you can see the part of code that changed:

- git log: It shows the history of your commits. You just have to write on your terminal:
You have to press "q" in order to leave from this command.
git log
- git reset: It sends you back to a previous version of your code (previous commit). In this example, you can go to your previous commit writing on your terminal:
Then, you have to reload your page (Ctrl + Shift + R or Cmd + Shift + R on a Mac) and you will see your code in the previous version.git reset --hard HEAD~1
Next step, let's see how you can easily work with your Git hosting service like GitHub and BitBucket.
Git hosting services
Git hosting services like GitHub and BitBucket are services that help you manage your code versions. The majority of modern developers use these services to manage their code in remote and to cooperate with other developers.
Connect
If you have already connected your Git hosting account with SourceLair you can ignore this chapter. Otherwise, you can read how to connect your account from:
- GitHub
- BitBucket
- any other git server:
- Login to your account at SourceLair.
- Open Command Palette, write "add new remote" and choose the available option.
- Complete the form. As "name of your new remote" you can complete "origin" in order to use this remote as your default remote for pushing and pulling. As "url of your new remote" you have to add the ssh url of your remote.

Push
In SourceLair, you are able to push using Command Palette. There are 2 options:
- push: It pushes your commited code to the origin remote. If you have cloned your project from any Git server then this server is your origin one. Otherwise, if you have added a new remote with the name "origin", it will be your origin remote.
- push to remote: It pushes your commited code to the remote that you will choose. You are able to choose among the remotes you have added. As we will see in the next chapter, you can use this command to deploy your code to your server
Useful info: Don't forget commit is local, push is not local.
Open Command Palette and push like a boss.
 (Using Command Palette for push)
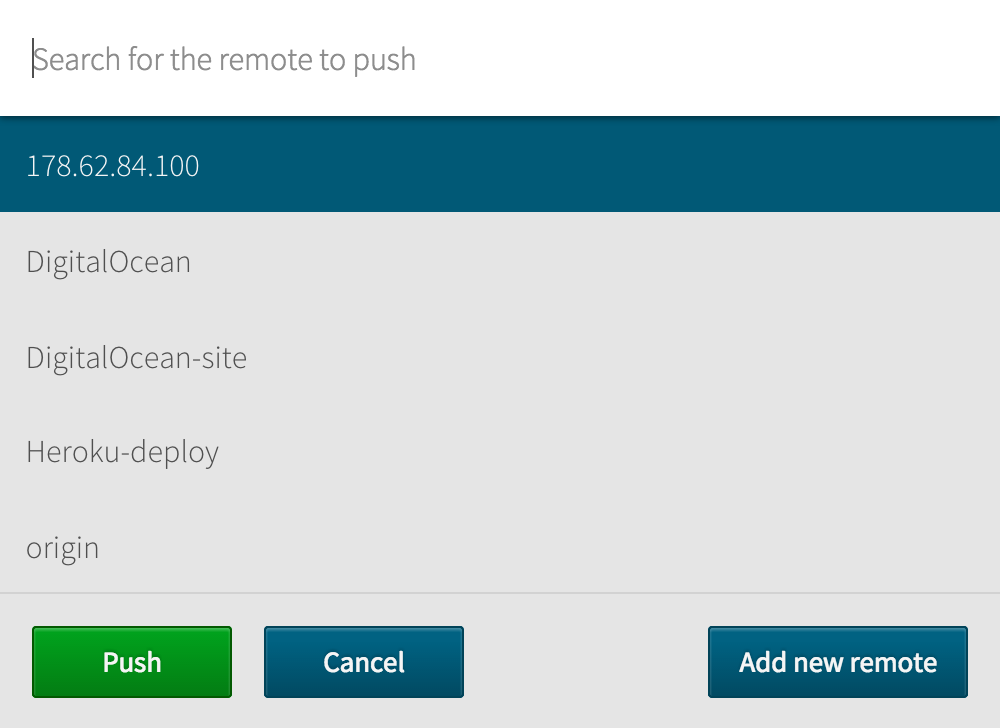 (Push to remote according to your added remotes)
Pull
In SourceLair, you are able to pull using Command Palette. There are 2 options:
- pull: It pulls your code version from your origin remote to your SourceLair account. If you have cloned your project from any Git server then this server is your origin one. Otherwise, if you have added a new remote with the name "origin", it will be your origin remote.
- pull from remote: It pulls your commited code from the remote that you will choose. You are able to choose among the remotes you have added.
Next step, let's check how you can deploy from SourceLair to your server.
Deploy
Long story short, using "push to remote" command that you have seen before, you are able to deploy your code to your server.
If this is your first time that you deploy using Git then you can follow this guide:
Deploying with Git
It contains an example of how to deploy to your DigitalOcean server and it is exactly the same for the most Ubuntu servers. After following this guide you will be able to deploy changes to your website just by commiting and then pushing to remote from Command Palette. Extraordinary simple and safe as you can preview your website at SourceLair first.
Last step, understanding Git status of your files from their color.
Visual status
Each time you create or update a file, it gets colored according to its Git status;
- Green, for new files

- Orange, for existing, modified files (uncommitted changes)

- Blue, for existing, unmodified files (no changes after commit)
 This way you are always aware if you have uncommitted changes in your project, without toggling the commit message prompt.